 GIBRID.AISchool
Finishing a clip: format, brand bar, editing and zip — free
The clip is ready, but you need a vertical version for Reels, a bar with your phone number, or a cut of several clips? These four tools run on our server without neural networks, so they do not spend tokens. The original clip is not changed — the result lands in your feed as a new entry.
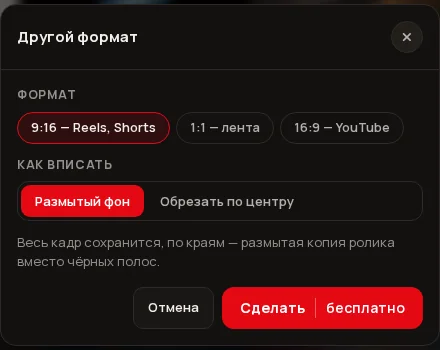
- “Another format (free)”: the clip in 9:16, 1:1 or 16:9; the edges are filled with a “Blurred background” or the frame is “Cropped to the centre”.
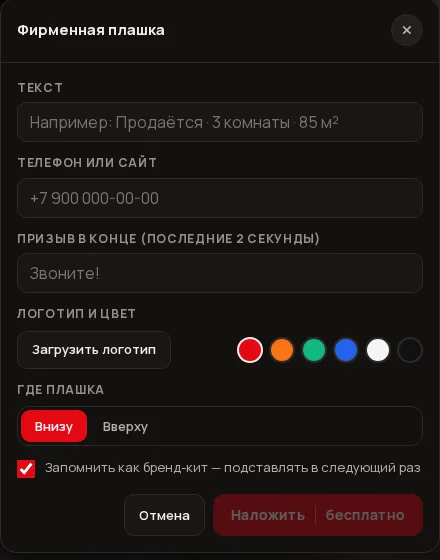
- “Brand bar (free)”: text, phone or website, your own logo, colour, a bar at the top or bottom and a call to action in the last 2 seconds; the brand kit is remembered.
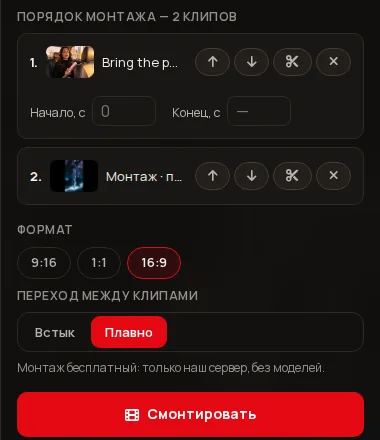
- “Editing” (the “Video” menu): 2–16 clips in the order you want, format, a “Hard cut” or “Smooth” transition (0.5 seconds), trimming with “Start, s” and “End, s” — free.
- “Download as .zip”: in “Select” mode tick your works — up to 60 files and 800 MB in one archive that is kept for about 2 hours.
- Each tool has limits: 20 runs per hour and 60 per day; one processing job at a time.
1What is included and where to find it
| Tool | Where to find it | Price |
|---|---|---|
| Another format | Clip viewer → actions menu → “Another format (free)” | Free |
| Brand bar | Clip viewer → actions menu → “Brand bar (free)” | Free |
| Editing | Top menu “Video” → “Editing” | Free |
| Download as .zip | “My generations” or the home feed → “Select” → “Download as .zip” | Free |
The actions menu opens when you click a finished clip in “My generations”. These items exist only for videos. The original clip is not changed: each result is a new entry in the original's project, titled like “Формат 9:16 · …” or “С плашкой · …” (the entry title is written in Russian).
2Another format: one clip in three formats
- Open the clip menu
In “My generations” click the clip and choose Another format (free). The “Another format” window opens.
- Choose a format
In the “Format” block: 9:16 — Reels, Shorts, 1:1 — feed or 16:9 — YouTube. Result sizes: 720×1280, 1080×1080 and 1920×1080.
- Choose how to fit
In the “How to fit” block click Blurred background (the whole frame stays and a blurred copy of the clip fills the edges instead of black bars) or Crop to centre (the frame fills the format entirely and the edges are cut off). A hint under the choice says what you will get.
- Press “Make it”
The button says “free”. After a few seconds the window says “Done. The clip in … format was added to your feed”. Open the clip opens the result, Another one returns to the choice.
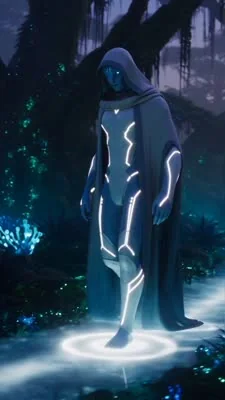
Sound is kept and the result's frame rate is 30 per second. The clip may be at most 3 minutes long, otherwise the server answers that the clip is longer than 3 minutes and cannot be converted.
3Brand bar: text, phone, logo, call to action
A bar makes the clip tell who you are and how to reach you: a price or address, a phone number, a logo and a call at the end. The fields are saved in the “brand kit”, so the second time you do not have to fill anything in.
- Open the window
In the clip's actions menu choose Brand bar (free). The “Brand bar” window opens.
- Fill in the texts
Text — up to 90 characters (hint: “For sale · 3 rooms · 85 m²”); Phone or website — up to 40 characters; Call to action at the end (last 2 seconds) — up to 60 characters, for example “Call now!”. Fill in at least one of text, phone, call or logo, otherwise the button is disabled.
- Add a logo and a colour
The Upload logo button accepts PNG, JPEG or WebP (up to 8 MB); later it becomes Replace logo, and next to it there is “Remove”. The colour is one of six: red, orange, green, blue, light grey, black. The logo must be uploaded to Studio with this button: a link to an outside site is not accepted.
- Choose the bar position
In the “Bar position” block click Bottom or Top.
- Decide about the brand kit
The Save as brand kit — fill in next time tick is on by default: the text, phone, logo, colour and call are saved in your account and filled in the next time you open the window. The bar position is not remembered.
- Press “Apply”
The button says “free”. The finished clip is added to the feed; the window says “Done. The branded clip was added to your feed; the original is unchanged”. Another variant returns to the fields.
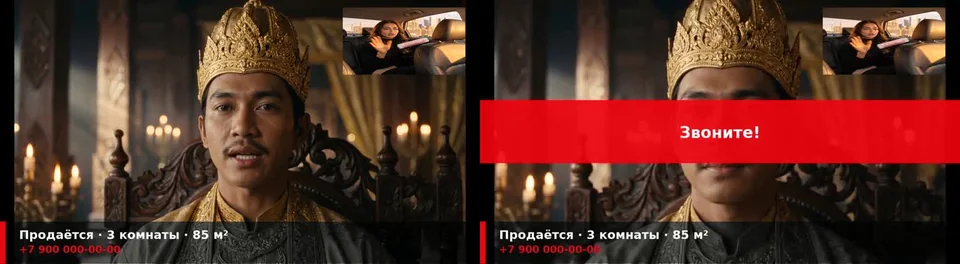
What it looks like: the bar takes 16% of the frame height, has a coloured stripe on the left, white text on the first line and the phone or website in the brand colour on the second. The logo sits in the right corner of the frame opposite the bar. The call to action appears on a wide coloured strip in the middle of the frame during the last 2 seconds (if the clip is longer than 2.5 seconds).
4Editing: join clips into one video
- Open “Editing”
Top menu Video → Editing (“Join clips into one video”). On the left are the “Available clips”, on the right the edit order.
- Choose clips
Click clips on the left: chosen ones get a number. You need at least 2 and at most 16 (otherwise “Select at least 2 clips”).
- Set the order
In the edit order block the Move up and Move down arrows move a clip, Remove from the cut removes it.
- Trim a clip if you wish
The Trim clip button opens the Start, s and End, s fields (0.5-second step). If less than half a second would remain after trimming, the server refuses.
- Choose a format and a transition
Format: 9:16, 1:1 or 16:9 (16:9 by default). Transition: Hard cut or Smooth — a 0.5-second crossfade. If “Music” has a last track, you can add it as a background with the “Track from Music” button (quieter than the voice; the track loops and the clip is not cut to its length).
- Press “Assemble”
Next to it it says “Editing is free: only our server, no models”. The finished clip appears in “My generations” titled “Edit · N clips”.
Editing limits: each clip is at most 3 minutes, the whole video at most 15 minutes. Clips are fitted to one format with black bars (no blur); if you want a blurred background, apply “Another format” afterwards. For a clip without sound the server adds silence so that the sound does not drift.
5Download as .zip: many works in one file
- Turn on selection
In “My generations” (or on the home feed) click Select above the mosaic. The button becomes Done.
- Tick the works
Click the cards; at the bottom you see “Selected: N”. Select all ticks everything at once, Deselect all clears it.
- Press “Download as .zip”
First you see “Building the archive…”, then “Archive ready: N files”, and the browser starts downloading the .zip.

- An archive holds up to 60 files and up to 800 MB; if more, you get “An archive holds up to 60 files — select fewer” or “The archive is too large — select fewer files”.
- If a card has several frames, all of them go into the archive.
- Only files from the Studio storage go into the archive; outside links and paths like “../” are rejected.
- Inside, files are numbered: 01_…, 02_… Videos and images are already compressed, so the archive size is roughly the sum of the files.
- An archive is meant to last 2 hours: the server deletes old archives when it creates new ones, so download right away.
6Limits and restrictions
| Tool | How many times | Size and length |
|---|---|---|
| Another format | 20 per hour, 60 per day | A clip up to 3 minutes |
| Brand bar | 20 per hour, 60 per day | A clip up to 3 minutes; text 90, phone 40, call 60 characters; logo up to 8 MB |
| Editing | 20 per hour, 60 per day | From 2 to 16 clips; each up to 3 minutes; up to 15 minutes in total |
| Download as .zip | 20 per hour, 60 per day | Up to 60 files and 800 MB; the archive about 2 hours |
The limits are counted separately for each tool. You can have one processing job of each kind running at once, and the server has three shared places for ffmpeg jobs. If you hit a limit you get “Too many requests in a row. Try again a bit later”. If the previous job is still running — “The previous processing is still running — wait for it to finish”. If the whole server is busy — “The server is busy processing clips right now. Try again in a minute”. (The server messages are in Russian.)
What is not done here: no choice of bar font, no several bars at once and no bar animation; editing cannot pick different transitions (only “Hard cut” and “Smooth”); trimming works by seconds, not by frames.
?FAQ
Is finishing really free?
Yes. Another format, the brand bar, editing and the zip are done by our server without neural networks, no tokens are spent. Only the limits restrict you: 20 runs per hour and 60 per day for each tool.
Will the original clip change?
No. The result is always a new entry in the feed, in the original clip's project. The original stays as it was.
What is better for Reels: a blurred background or a crop?
A blurred background keeps the whole frame but a copy of the clip appears at the edges; a crop fills the whole vertical frame but cuts the edges off. For products and interiors blur is better, for faces — crop.
Where is the brand kit stored?
In your Studio settings on the server: text, phone, logo, colour and call. It is filled in the next time you open the “Brand bar” window. You can switch remembering off by clearing the tick before pressing “Apply”.
Why can't I download the archive?
Most likely more than 60 files are selected, or the files weigh more than 800 MB in total, or the limit of 20 archives per hour is exceeded. Select fewer works and try again.
How is the bar different from “Watermark” in the image editor?
The watermark is put on an image in the editor on your device. The bar is for a finished clip, with a phone number, a call in the last 2 seconds and a saved brand kit.
Related
Subtitles: the speech from your clip as text on screen
Many people watch clips without sound, and platforms and editors need files with text. The “Subtitles” window…
Read more →Translate a clip: the same clip in another language
Do you have a clip with speech and need a version in another language? “Translate the clip” recognises the…
Read more →Edit the clip with words: “make it night” instead of a new shoot
The clip is almost right, but you need other weather, time of day or clothes? The viewer of a finished clip…
Read more →Quick image edits: pick an option, press “Apply”
No need to paint an area with a brush and write a description. The image edit screen has a “Quick edits”…
Read more →My generations, Favorites and Library
Everything you create in Studio is collected in one place. Here you can find an old work, mark a favorite…
Read more →