 GIBRID.AISchool
Quick image edits: pick an option, press “Apply”
No need to paint an area with a brush and write a description. The image edit screen has a “Quick edits” block: pick what to change (lighting, angle, time of day, weather or clothing), tap a ready-made option, and the model redoes the frame while trying to keep everything else.
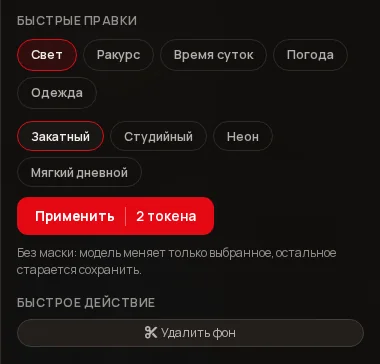
- The “Quick edits” block is first in the right panel of the image edit screen (the “Send to Edit” button in the viewer panel of any of your images).
- Five groups: “Lighting”, “Angle”, “Time of day”, “Weather”, “Clothing”; each has 3–4 ready-made options.
- No mask needed: pick one option and press “Apply” — the price (currently 2 tokens) is on the button before you run it.
- One proven editing model does the work — Nano Banana 2.1; the frame format is kept (long side 1024 pixels).
- Next to it, in the “Quick action” block, is a “Remove background” button: before it runs, a window shows the price (“less than 1 token”) and your balance.
1Where to find quick edits
- Open the image in the editor
In “My generations” click an image tile and in the preview panel choose Send to Edit (in the actions menu the same item is called Open in Edit, on the home feed — Open in editor). Or open the top menu Images and choose, for example, Redraw area — it is the same edit screen.
- Choose an image
If the image did not open on its own, click Upload image on the left or pick a frame from Recent frames. With no image the edit button is grey and the hint says “Select an image first”.
- Find the “Quick edits” block
It is first in the right panel, above the “Quick action” block and the list of tools (Brush, Outpaint, Crop, Watermark and others).
2How to make an edit
- Choose a group
Click one of the tabs: Lighting, Angle, Time of day, Weather or Clothing.
- Choose an option
Click a ready-made option. Clicking it again clears the choice. You can pick only one option at a time.
- Press “Apply”
The price is on the button — currently Apply with “2 tokens”. Until an option is picked the hint says “Pick an option”, and until the price arrives from the server the button is disabled. While it works the label changes to “Changing…”.
- Look at the result
The new image appears on the stage. Continue editing makes the result the new source (so you can apply the next edit), Download saves the file. A “Done” message appears.
Under the options there is a note: “No mask needed: the model changes only what you picked and tries to keep the rest.” “Tries” is not a guarantee: on complex frames (many people, small details) secondary details may change. If that happens, go back to the original and try another option.
3Which options there are
| Group | Options | What changes |
|---|---|---|
| Lighting | Sunset, Studio, Neon, Soft daylight | The lighting of the frame; people and composition stay the same. |
| Angle | Top, From the side, Close-up, Wide shot | The camera position or shot size; clothing, people and light stay the same. |
| Time of day | Morning, Day, Evening, Night | The sky and lighting for the chosen time. |
| Weather | Rain, Snow, Fog | Weather is added; everything else is kept. |
| Clothing | Business suit, Casual, Evening outfit, Sportswear | The person's clothes in the photo; face, hair, pose and background stay. |
4How it works under the hood
Each option is a ready-made instruction for an ordinary text edit of an image. Your whole image is sent to the Nano Banana 2.1 model together with that phrase, which already says “keep the same people, faces and composition unchanged”. No mask is used — hence “no mask”.
The frame format is kept: the app reads your image's proportions and asks for a result whose long side is 1024 pixels. Before, the model turned a vertical photo into a square; now vertical stays vertical and horizontal stays horizontal.
5“Remove background” and other quick actions
Under the “Quick edits” block there is a Quick action block with a Remove background button. It cuts out the main object and makes the background transparent; the hint says “Cut out the object, the background becomes transparent”. While working the button says “Removing background…”, when done — “Background removed”.
The other tools on this screen — Brush, Outpaint (extend the frame), Crop, Watermark, Objects and Layers — work in their own way. Crop and watermark run on your device and cost 0: no model is called.
?FAQ
How much does a quick edit cost?
Currently 2 tokens per press of “Apply”; the price is on the button and comes from the server, so it may change. Until the price has loaded the button is disabled.
Why is the “Apply” button grey?
One of three reasons: no image is selected (the hint “Select an image first”), no option is picked (“Pick an option”), or the previous edit is still running (“Changing…”). The button also waits for the server to report the price.
Can I choose lighting and clothing at once?
Only one option at a time. Make the first edit, press “Continue editing” (the result becomes the source) and apply the second. Each edit is paid for separately.
Will the face change?
Every instruction to the model says to keep faces, hair and pose, but that is a request, not a guarantee. If the face drifted, go back to the original and try another option, or use “Brush” on the area you need only.
How is this different from “Redraw area”?
There you paint an area with a brush yourself and write what to draw. Quick edits are ready-made phrases for the whole frame without a mask: simpler and faster, but less precise.
Can I edit a video like this?
No, quick edits are for images only. For finished videos there is a separate “Edit the clip with words” button — see the guide.
Related
Edit the clip with words: “make it night” instead of a new shoot
The clip is almost right, but you need other weather, time of day or clothes? The viewer of a finished clip…
Read more →Finishing a clip: format, brand bar, editing and zip — free
The clip is ready, but you need a vertical version for Reels, a bar with your phone number, or a cut of…
Read more →Small things that save time and money
Not big features but Studio's small habits: say a prompt by voice, see the exact price before you click, get…
Read more →My generations, Favorites and Library
Everything you create in Studio is collected in one place. Here you can find an old work, mark a favorite…
Read more →Templates in Studio: a video from a ready recipe
A template is an already configured scene: the model, description, format and duration are chosen for you.…
Read more →