 GIBRID.AISchool
Animate a photo: from a picture to a clip in one step
Want a still photo to breathe, move its hair, or be circled by a camera, without learning about models and settings? Studio has two short paths for that: the “Animate a photo” card for your very first clip, and the “Animate selected” batch for several pictures at once.
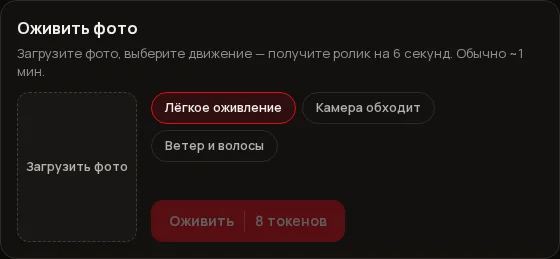
- “Animate a photo” is a card in an empty video feed: upload a photo → choose “Subtle motion”, “Camera orbit” or “Wind and hair” → press Animate. You get a 6-second 720p clip.
- The price is on the button before you start (“Animate · N tokens”, currently 8), and next to it you can see how many such clips your balance covers.
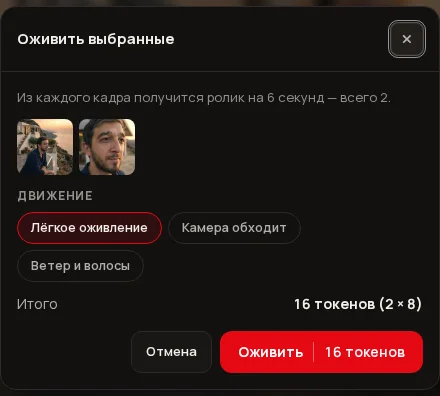
- Several pictures at once: in the Images feed press Select, tick up to 10 frames → Animate selected. One motion for all, and the total is shown before you start.
- No more than 3 clips run at once: the other frames of the batch wait in a queue and go on their own, and unsent ones are not charged. You can cancel the queue with the “Cancel the rest” button in the feed.
1What it is and what is inside
Both ways do the same thing: they take your picture as the first frame and ask the Grok Imagine 1.5 model (xAI) to turn it into a short clip. The model, length and quality are chosen for you so a beginner has nothing to set up: 6 seconds, 720p.
There are three motions, and the name on the button describes what the model is asked to do:
- Subtle motion — breathing, a soft blink, a little movement of hair and fabric. The camera is still, the face and composition stay unchanged.
- Camera orbit — the camera smoothly circles the subject while the subject stays calm and natural.
- Wind and hair — a light breeze moves hair and clothes, leaves and light in the background shift slightly, and the camera gently pushes in.
You cannot type your own motion text here. If you need another model, a different length or your own description, make the clip the usual way through the Studio composer — see your first clip in 5 minutes.
2The “Animate a photo” card for your first clip
The card appears while your video feed is still empty: no finished clips and no clips in progress. As soon as the first clip appears, the card disappears — after that you make clips through the composer or as a batch (see below).
- Open Studio and the Video section
On the site this is gibrid.ai/provideo, the Video item in the top menu. In an empty feed you will see the Animate a photo card in the middle.
- Upload a photo
Press Upload photo and choose a picture. If the file is not an image, the screen replies “An image is needed: JPG, PNG or WEBP”. You can swap the photo with the same button — it turns into Replace photo.
- Choose a motion
One of three: Subtle motion (selected by default), Camera orbit or Wind and hair.
- Check the price and press “Animate”
The button says “Animate · N tokens”. Above it is the line “Your balance covers N clips like this”: your balance divided by the clip price. If the balance is too low, it says “Your balance isn’t enough for this clip — top it up” instead. Until a photo is uploaded the button is inactive (hint “Upload a photo first”).
After you press it, the clip starts the usual way: a placeholder card with progress appears in the feed, and when it is ready you get a “Done” signal. Under the card title the server shows how long it usually takes (“Usually …”); in our checks one such clip took less than a minute, but the exact time depends on load.
The finished clip is in “My generations”. From there you can download it, add subtitles or translate it into another language.
3If you already have clips
The card is only for the first run, so it is not in a regular feed. You can still animate a picture in two ways.
- One picture — open it full screen in “My generations” (the pictures feed) and press Frame to video. The picture becomes the first frame of the video in the composer; you then choose a model, write what should happen and press Generate.
- Several pictures — the “Animate selected” batch, described below.
4“Animate selected”: up to 10 frames at once
The batch is for when you have several frames in your pictures feed and want a clip from each with the same motion.
- Open the pictures feed
In the top Studio menu choose Images — that is the feed of your pictures. The buttons above the feed appear once it has works in it.
- Press “Select”
A button above the feed. Cards become selectable and a bar appears at the bottom: “Select cards”, and after the first tick, “Selected: N”.
- Tick the frames
Click the cards. Select all and Deselect all tick or untick everything at once.
- Press “Animate selected”
A button on the same bar (hint “Up to 10 frames at once”). The “Animate selected” window opens with thumbnails of the chosen frames.
- Choose a motion and check the total
The Motion row has the same three options. Below it is the “Total” line, for example “16 tokens (2 × 8)”. If more than 10 frames are chosen, the window warns: “Up to 10 frames can be animated at once — the first 10 will be used”. If there are more frames than free places (up to 3 clips can run at once), the window says how many go right away and how many wait in the queue.
- Press “Animate”
The button shows the total. The window closes and the clips start one after another.
How the series runs. Frames are sent one by one. The first go out at once while fewer than 3 clips are running for you, and the rest wait their turn and are sent on their own when a place frees up. You pay for each clip when it is sent; clips waiting in the queue are not charged. While the queue is not empty, a strip above the feed reads “Clip queue: N of M sent. The rest will go on their own when there’s room (up to 3 can run at once)” with a Cancel the rest button. After cancelling, the strip says “Clip queue cancelled — unsent clips aren’t charged”. If sending stopped for another reason (not enough balance, a check failed), the series ends and shows “Sent N of M — the rest didn’t run and wasn’t charged”.
The batch exists for pictures only. A clip already moves, so there is no batch for clips: you can change a finished clip with clip editing.
5How much it costs
| What | Price |
|---|---|
| One clip (6 seconds, 720p) | 8 tokens |
| A batch of 2 frames | 16 tokens (2 × 8) |
| A batch of 10 frames (the maximum) | 80 tokens (10 × 8) |
| Uploading a photo, choosing a motion, seeing the price | free |
6What is not here
- You cannot pick another model, length or quality: the card and the batch always use Grok Imagine 1.5, 6 seconds, 720p. For other settings use the composer.
- You cannot type your own motion text: only the three ready options.
- More than 10 frames at once is not possible; extra frames are dropped and the first 10 are used.
- More than 3 generations running at the same time is not possible: extra frames of the batch wait in the queue (the queue waits for a free place for no more than half an hour, then the series ends).
- The batch works only in the pictures feed, not in the clips feed.
?FAQ
Why don’t I see the “Animate a photo” card?
It shows only in an empty video feed — while you have no clips and no clips in progress. Once the first clip appears, the card goes away. You can still animate a picture with the “Frame to video” button or the “Animate selected” batch.
How much does one clip cost?
Currently 8 tokens for a 6-second 720p clip. The exact number is always written on the “Animate” button before you start, while you have spent nothing.
Can I choose another model or make a longer clip?
Not in the card or the batch — everything is chosen for you there. Choose another model and length in the regular Studio composer.
What happens if my balance is not enough for the whole batch?
The series stops at the frame that could not be sent. Clips already started are paid for; the rest did not run and cost nothing. The screen tells you: “Sent N of M — the rest didn’t run and wasn’t charged”.
Why didn’t all the frames of the batch start at once?
No more than 3 clips run at once. The first go out right away, the rest wait in the queue and start on their own when a place frees up. The queue is shown as a strip above the feed; the “Cancel the rest” button removes the frames not yet sent, and they are not charged.
Where do I find the finished clip?
In Studio, in the Video section, in the “My generations” feed. You can also add subtitles and translate the clip there.
Related
Chains: one photo, several finished shots at once
A chain is a ready-made sequence of steps. You upload one photo and press one button, and Studio makes the…
Read more →Subtitles: the speech from your clip as text on screen
Many people watch clips without sound, and platforms and editors need files with text. The “Subtitles” window…
Read more →Translate a clip: the same clip in another language
Do you have a clip with speech and need a version in another language? “Translate the clip” recognises the…
Read more →Templates in Studio: a video from a ready recipe
A template is an already configured scene: the model, description, format and duration are chosen for you.…
Read more →Billing, plans and balance: how it works
Gibrid has one balance for everything: chat, images, video, voice and agents. It is spent in ⚡ G-tokens, and…
Read more →